Saturday, August 5, 2017

HackThis Solutions | Basic+ Levels

Hello everyone! Firstly, I'd like to warmly welcome you all.

In this write-up, I'll show you the steps I took to solve HackThis Basic+ Level challenges. To remind you, I demonstrated the solutions to the Main Level challenges in my previous blog entries: HackThis Main Level 1-6 SolutionsHackThis Main Level 7-10 Solutions.

Okay, let's get started.

Basic+ Level 1

In this level, we are expected to extract the login details from the text file b1.txt. I clicked the given link to download the file. Everything seems straightforward, right? I was thinking the same; until I saw bunch of non-ASCII, i.e., non-readable, characters when I opened b1.txt in a text editor (e.g. Notepad or GNU Nano).

So, what could I do to proceed?

At that point, I wanted to see the file as a binary. I opened up Bash, and typed the command:

xxd b1.txt | head

In order to see the first 10 lines of the file, in binary format. This is how it looks like:


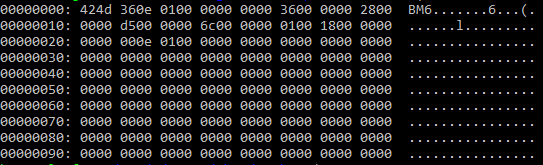
Can you see the first three characters, i.e., BM6? It looks like interesting, since the first few bytes of most of the files is a "magic number" (0x424d36 == "BM6" in our case), which is a signature for different file types such as .txt, .bmp, .jpg, .exe, etc.

Since I saw that the ".txt" file is not human-readable, unlike a real .txt file, I thought this magic number corresponds to another file format. I searched the keyword BM6 in Google, and ta da! Our file seems to be a .bmp file instead of a .txt file! So, we should open it with an image viewer, not a text editor!

I then renamed the file with the Linux command:

mv b1.txt b1.bmp

And opened b1.bmp with an image viewer program. There lies the secret credentials:


We are done!

Lessons Learned: Renaming a file by changing its extension doesn't hide the actual file extension. By looking at the "magic number", the original file type can easily be understood.

Basic+ Level 2

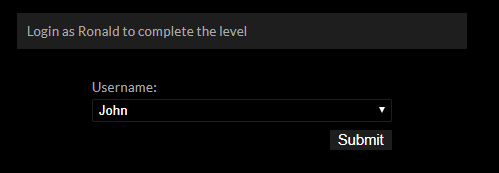
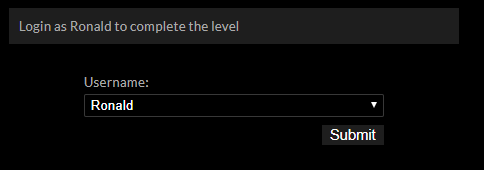
This time, unusually, we don't encounter a form asking for username or password. This is the screen we directly encounter:


Interesting. Apparently, we need to play with the user agent. But hey, what's that?

User agent is an HTTP header, showing the details about the web browser we use to the websites. Let's look at an example (for a Mozilla Firefox browser):

User-Agent: Mozilla/5.0 (Windows NT 6.1; Win64; x64; rv:47.0) Gecko/20100101 Firefox/47.0
So, what should we do with this?

The error screen tells that "only secure_user_agent allowed." What about trying to modify our User-Agent HTTP header, changing it to the string "secure_user_agent"? Seems like a good idea. But how can we modify HTTP headers?

Basically, there are various programs that can intercept your Internet traffic, and allow modifications. Burp Suite is such a program, which also comes with other nice functionalities; especially if you are a web application security specialist. Such a program can be used to perform the modification we want.

However, I preferred to use a Google Chrome plugin, Requestly (which is also available for Firefox). It is quite simple to use, and saves from the burden of setting a local proxy, handling TLS certificate issues arisen by the proxy, etc., which happens when using an external program like Burp Suite.

In Requestly, I set up a rule for https://www.hackthis.co.uk/levels/basic+/2:


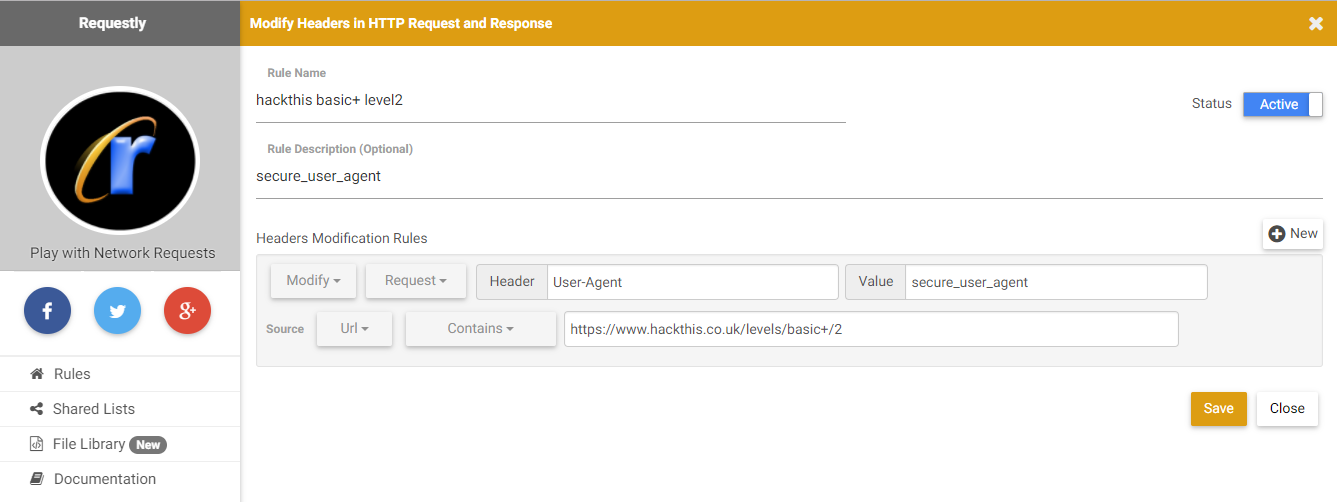
As you can see above, I chose to Modify the HTTP Request Header User-Agent, changing its value to secure_user_agent.

Reloading the page, it's done!

Lessons Learned: HTTP request header User-Agent is used to share the details of user's browser to the website. However, this header (and all the other headers) can be modified by the user; so websites shouldn't trust to the information they read from HTTP requests. Also it is a good idea to spoof your User-Agent header, if you are concerned about privacy.

Basic+ Level 3

In this level, a quite different screen welcomes us:


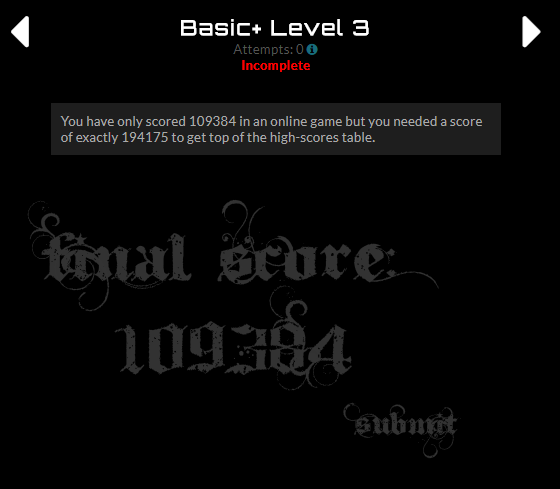
So, apparently, I have only scored 109384 in an online game, where I needed to score exactly 194175 to get top of the high-scores table. Maybe I should still congratulate myself, huh? At least I scored that much without playing that game even for one second!

Below the text, we see a Flash object, showing our total score. It is a good idea to inspect this object.

I looked at the source code of the webpage to locate where the Flash object resides. This part of the code shows the location:

<object width="485" height="285"> 
    <param value="/levels/extras/b3.swf" name="movie"> 
    <embed width="485" height="285" src="/levels/extras/b3.swf" bgcolor="#000000"> 
 </object>

Navigating to the highlighted link, I downloaded the Flash object b3.swf. To understand how it interacts with the webpage about the total score, I decided to reverse engineer it by decompiling the object to get the source code.

Luckily, decompiling Flash is fairly straightforward in most cases. Using an online tool like ShowMyCode, I performed the decompilation:


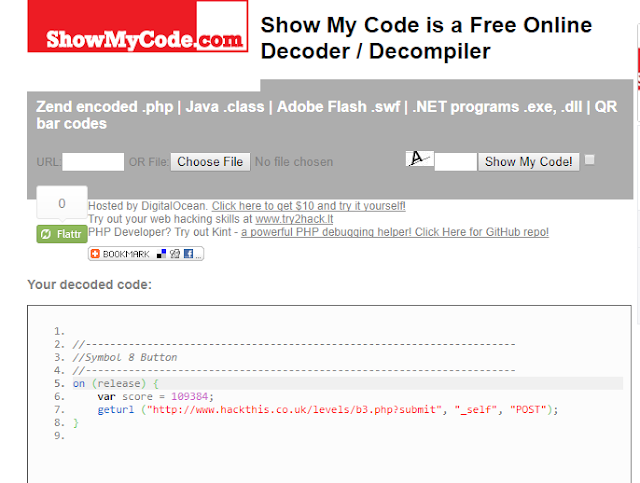
So, the object has a fairly simple code. There is a variable named score, which holds the default score, and this variable is sent to the website by a HTTP POST request, to the URL above. Apparently, we learnt the mechanism going on behind the scenes. Now, what should we do?

There came 2 ideas to my mind:
  • Editing the decompiled source code, so that score variable holds the score we want; then, compiling the edited source code, and creating an HTML, embedding the compiled new Flash object, clicking Submit on the Flash object.
  • Creating an HTML form with a HTTP Post method which submits the score we want with the name score.
I chose the latter idea, since it is simpler than the former. I created the following simple HTML file*:

<html>
    <form action="http://www.hackthis.co.uk/levels/b3.php?submit" method="post">
        <input type="submit" name="score" value="194175">
    </form>
</html>
*To create an HTML file, you can simply open a text editor of your choice, type in some HTML code, and save the file with the file name extension .html.

Then, I opened this HTML file in my browser, and clicked the button. That's it!

Lessons Learned: Reversing a Flash object to get its source code is fairly easy; so you cannot trust the information within the Flash object. Some other mechanism should be employed to provide information integrity.

Basic+ Level 4

This time, the level requires correct username and password information to pass, as being in the older levels. Moreover, a clue is already given within the screen to guide us: 
Look at my awesome picture: b4.jpg 
Following the link given for b4.jpg, I downloaded the image file, which looks like this:


Yes HackThis, the picture is really awesome. 

But what about the username and the password? Maybe a combination of the words "sun", "sea", "sky", "clouds", "beach", etc.? Let's first analyze the file in binary format, and proceed with this idea if no help comes out of that.

I typed  xxd b4.jpg | less  in Bash to analyze the image file as a binary. This gave quite interesting results:


This is the beginning of the binary, as you can trace from the hex numbers on the left column. And as you can notice, we see some ASCII (human-readable) characters on the right column. Have you already seen something interesting? What about the line 000000f0? Who is james? Maybe it is the username, can't that be?

Okay, we have a guess for the username. But, what about the password? Continuing to inspect the binary, we notice another interesting part:


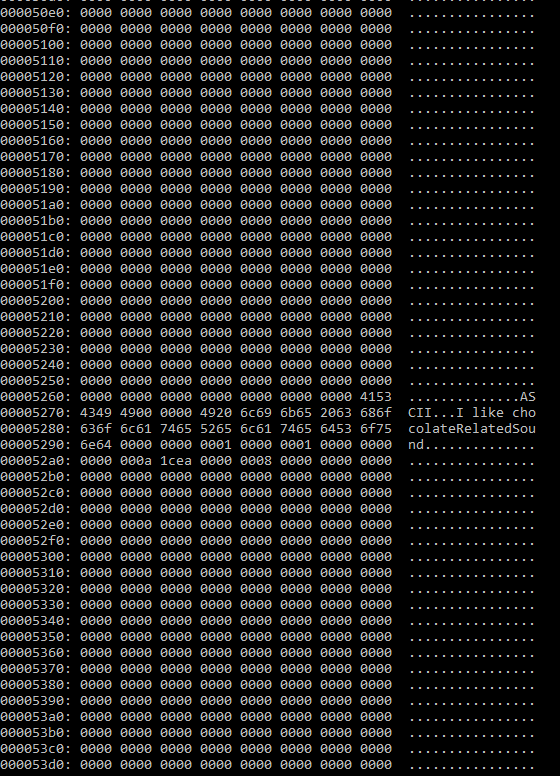
Bunch of zeroes everywhere, except in the middle. There we read "ASCII..I like chocolateRelatedSound". What is that? A riddle? This has to do something with the password.

Searching the Internet for "chocolate related sound" doesn't give any valuable result. Doing a little brain exercise on the types of music, which may be related with chocolate, also doesn't help. What can be the password?

At this point, I decided to try each word of the phrase as password. Guess what happened...

I passed the level with the username james, and password chocolate!

Lessons Learned: Images, or other non-text files, can be used to deliver hidden information (which is called Stenography). Inspecting images, or other non-text files, in binary format may reveal precious information, if a stenography technique is used within the file.

Basic+ Level 5

As similar to the previous level, we are asked to look at a picture. I downloaded the image given in the link, which is the following:


Dear HackThis... I am sorry, but this one is not awesome! :P

Again, we don't see any username or password within the image. So, I again opened it in binary format, as Basic+ Level 4. After inspecting with less, I run commands head and tail for brevity:


As you can see above, head doesn't show any precious information that may be hidden in the image; but it is not same with tail. Inspecting the right column, where ASCII characters are shown, we notice an interesting stream of characters, secret txt:

     user: admin    ..     pass: safePK    .....

This looks like the credentials we are looking for! However, this combination failed, when I typed the password "safePK". Instead, I decided to enter only the word safe, which actually looked like more appropriate, with the username admin. Voilà, that's it!

Lessons Learned: Repeating, images (or other non-text files) can be used to deliver hidden information.

Basic+ Level 6

This level welcomes us with a different form. The form asks for three pieces of information:
  1. What is the IP of the server hosting this page
  2. What company hosts our server
  3. X-B6-Key header
To answer the first question, numerous methods can be used. I used the command:

ping www.hackthis.co.uk

Which showed the IP address of the website: 85.159.213.101. So, the first question is done.

For the second question, I performed a whois lookup, using the command;

whois hackthis.co.uk

The name-servers returned upon the whois lookup were pointing to the answer:

ns1.linode.com
ns2.linode.com
ns3.linode.com
ns4.linode.com

Visiting linode.com, I saw that the name of the company was as I expected: Linode. So, the second question is also done.

For the third question, I searched in Google about the header; but that didn't help much. Noticing B6 part should be standing for "Basic+ Level 6", I thought that this header is a special header HackThis uses.

So, where does HackThis use this special header?

Inspecting HTTP headers through Chrome's Inspect pane didn't help. There was no X-B6-Key header. Another idea is to inspect emails sent from hackthis.co.uk. However, unfortunately, email system of HackThis is down. We cannot receive any email from HackThis. Thus, we cannot also check X-B6-Key header among the email headers.

At this point, I got stuck. My guess is X-B6-Key header is an email header. However, since the email system of HackThis is down, I cannot test that. I hope they will fix their email system shortly, so that I can update here.

Lessons Learned: Learning the IP address of a website is trivially easy. Moreover, lookups like whois (and nslookup) may provide precious information about the website. In fact, these lookups are frequently used in network reconnaissance.

Basic+ Level 7

This is the last Basic+ level of HackThis. In this level, we are given the following information:
We are running a suspicious looking service. Maybe it will give you the answer.
Apparently, we need to find other services (rather than http) being run on the website. But, how can we do this? Our answer lies in port scanning.

I used nmap to scan all the TCP ports (0-65535) of hackthis.co.uk at the IP address 85.159.213.101, which we found in the previous level. The reason I didn't scan UDP ports is that to give the answer, the server should somehow connect to the client. However, UDP is a connectionless protocol. It makes much more sense for server to use TCP to give the answer.

This is the nmap command I used:

nmap -v -sV -p- 85.159.213.101

While the scan was progressing, apart from the non-suspicious looking open ports (22: ssh, 80: www-http, 443: ssl/https), nmap had found some open "suspicious looking service"s on ports 6459, 6460, 6776, 7031, and 7527:


Simultaneously, I had been using Python's Socket API to connect each of these open TCP ports, and try retrieving information about the answer, with the Python code I put below. Trying each port one-by-one, I managed to find the port which responds with the answer, i.e., Port 6776:


As you can see above, the response of the server from Port 6776 is:
Welcome weary traveller. I believe you are looking for this: mapthat\n
So, our answer is: mapthat

That's all!

Lessons Learned: Services other than http/https (TCP ports 80, 443) may be running on websites. The list of running services and open ports is a very precious information for a hacker. It can easily be obtained by the port scanning tool nmap.

----
Thank you all for reading my blog entry. I wish you happy ethical hackings! :)

Thursday, August 3, 2017

HackThis Challenge Solutions | Main Level 7-10

Hello again! I'd like to warmly welcome you all.

This write-up is the second part of the HackThis Main Level challenge solutions, which includes Levels 7-10. For the first part, which includes Levels 1-6, please follow this link.

Let's continue from where we last left off.

Main Level 7

Again and again, I started this level by looking at the source code. However, this time everything was as usual, and there were seemingly no hints within the source code to hack the username and the password.

I also tried entering a random username and password, for testing the response of the website to a wrong credential. Again, no help.

This time, I decided to use the Show hint button to get some clue on how to proceed. The hint was quite helpful:
The password is again stored in a txt file. This time however it is not as straight forward as viewing the source.
You wouldn't even find the page by using a search engine as search bots have been excluded.
We even can't find the .txt file, which stores the password, by using a search engine?! Because search bots have been excluded??! Alright, this is the way to go. There must be a way to tell the search bots exclude something within the website.

Have you ever heard of robots.txt? There lies our answer.

Robots.txt is the file, which is put in the root directory of the website, that tells search bots not to index some parts of the website. And good news is, since it should be seen by the search bots, it is a public file; so we can easily reach that!

Now, I navigated to https://www.hackthis.co.uk/robots.txt. This is the file we would like to see:

User-agent: *
Allow: /
Disallow: /contact.php
Disallow: /inbox/
Disallow: /levels/
Disallow: /levels/extras/userpass.txt
Disallow: /users/
Disallow: /ctf/8/php/*

User-agent: Mediapartners-Google
Disallow:

Sitemap: https://www.hackthis.co.uk/sitemap.xml

As seen, robots are disallowed to index some parts of the website. For our purposes, we seek for a .txt file among them. Can you see that? Our candidate is /levels/extras/userpass.txt.

Let's visit https://www.hackthis.co.uk/levels/extras/userpass.txt. We encounter the following .txt file:

48w3756
u3qh458

It seems like the first line corresponds to the username, and the second line to the password. Trying this combination, we complete the level!

Lessons Learned: Using robots.txt is a way to hide information within a website from the search engine bots. However, it is not wise to put this information; since it shows the locations of potentially precious information to the hackers! Moreover, it is the choice of the search engine itself to whether comply with the rules identified in robots.txt or not; so it may be of no value for some search engines!

Main Level 8

Again, and again, and again... I started by looking at the source code of the webpage. Searching for the keyword Username gave an important result in this level, similar to Main Level 4:

<input type="hidden" name="passwordfile" value="extras/secret.txt">

So, our target is to reach the location extras/secret.txt. Navigating to https://www.hackthis.co.uk/levels/extras/secret.txt, we get the following:

1011 0000 0000 1011
1111 1110 1110 1101

This seems like a binary-encoded username and password pair. We should decode this binary to text format. There can be various binary representations, so it is not as straightforward as to put the numbers into a decoder, and get the result. Each different binary representation would yield to a different text.

However, partitioning the binaries as nibbles (i.e., 4-bits groups) seems like a hint to me. The first thing comes to my mind is the possibility that these binaries representing hexadecimals. To the readers who are unfamiliar with these terms, I recommend you to Google about binary numbers, hexadecimal numbers, and binary-hexadecimal conversions.

At this point, I tried to convert each nibble to its hexadecimal equivalent. This yields a very good candidate for the username and password combination:

     Username:     b00b
     Password:      feed

However, this combination fails. Before giving up on the idea to convert to hexadecimal, since this looks like a good candidate, let's try them in capital letters, as both lowercase and uppercase characters can be used to represent a hexadecimal:

     Username:     B00B
     Password:      FEED

Voilà! This is the answer!

Lessons Learned: Storing the user credentials in a publicly accesible file is a terrible idea, even if different representations are used. In this level, decoding from the binary format was relatively easy; but even if there was a complex and unknown decoding algorithm, someone can eventually hack and solve it --not maybe today, but definitely tomorrow.


Main Level 9

This time, a slightly different screen welcomes us. There is a link, Request details, below our username and password form. This link seems like the way to go.

Upon clicking the link, we see a different form, asking for an email. Let's inspect this email form:

<form method="POST">
  <fieldset>
    <label for="email1">Email:</label>
    <input type="text" name="email1" id="email1" autocomplete="off"><br>
    <input type="hidden" name="email2" id="email2" value="admin@hackthis.co.uk" autocomplete="off">
    <input type="submit" value="Submit" class="button">
  </fieldset>
</form>

Have you seen the interesting part? Let's look at that closely:

<input type="hidden" name="email2" id="email2" value="admin@hackthis.co.uk" autocomplete="off">

We again encounter a "hidden" field, and it apparently has the email address of the administrator. What about tampering with this information as we did before? 

To solve the challenge, I changed that email address to an artificial email address I own, say darkvanilla@vanillasec.net, using the Inspect pane of Google Chrome. Moreover, I entered the same email address, darkvanilla@vanillasec.net, in the input field of the form. Clicking the Submit button, it's done!

Lessons Learned: Again, hidden HTML fields are not hidden! And again, users can always change client-side code; so the server-side should always check against any tampering.


Main Level 10

This is the last Main Level of HackThis. Again, I started by viewing the source code of the webpage. Searching for the keyword Username again gave an interesting result:

<input type="hidden" name="passwordfile" value="level10pass.txt">

We again see a "hidden" HTML field. This field points to the passwordfile, so it's our target. Let's navigate to https://www.hackthis.co.uk/levels/extras/level10pass.txt. I was able to guess this link directly since I saw the directory extras in the preceding levels. However, it is also possible to do a Google search within the website with the name of the .txt file. 

site:hackthis.co.uk   filetype:txt   level10pass

Google can easily find the file, since it is not included in robots.txt. By the way, there is no point to ask; "What if it was included in robots.txt," right? :)

Reaching to the text file, we get:
69bfe1e6e44821df7f8a0927bd7e61ef208fdb25deaa4353450bc3fb904abd52:f1abe1b083d12d181ae136cfc75b8d18a8ecb43ac4e9d1a36d6a9c75b6016b61
This seems like the credentials, stored in an encrypted format, with colon, i.e., ":", being the delimiter separating the username and the password. At this point, we need to decrypt this to pass the level.

Inspecting the format of the encrypted output for both the username and the password, we see that they are of the same length, and constructed with the same character set. In particular, they are both 64 characters long (you can run the command echo X | wc -c, where X is the hash above, to count the number of the characters on Linux Terminal, i.e., Bash; or can use an online source), and each character ranges from 0-f (apparently, hexadecimals). Since each hexadecimal (one character) is represented by 4-bits, we see that each encrypted output has length 256-bits. Any guesses for the encryption, or should I say hashing?

Noticing that passwords are generally stored as hashes, and seeing that each hash in this case is of 256-bits length; our number-1 guess for the hashing algorithm is SHA-256, which is the most popular hashing algorithm of 256-bits length.

Okay, we have a guess for the hashing algorithm; so what can we do to decrypt?

Well, there is no decryption process for hashing. Hashing is a one-way function, i.e., we cannot predict the text version from a hash. So, what can we do?

The only chance we have is to guess. We can write a script to guess many options, and try to match the hash of our guess, and the hash we have to get the answer. However, in most of the cases, this is infeasible --unless we have a very common username and password.

For our purposes, let's simply use an online service. Searching in Google for the keywords "SHA256 decrypt online" will lead to such an online service (this is one of such a service). Entering our hash strings above, the decrypting website gives us the answers:

     Username:     carl
     Password:      guess

So, we are lucky that the credentials are from the common words and easy, since they are included in the online database. Moreover, we are lucky that the website doesn't use salts for their hashes; which makes it even harder to guess.

Entering the credentials above, we are done!

Lessons Learned: Again and again, hidden fields are not hidden! It is not a good idea to put passwords file within the website directory. Moreover, even if encryption/hashing is used to protect information, they can be broken. In addition, for the security of users, long and complex passwords should be mandated by the website, and passwords should be stored as salted hashes.

Thank you everyone for reading my blog! Stay tuned for more write-ups!

HackThis Challenge Solutions | Main Level 1-6

Hello all! I'd like to warmly welcome everyone visiting my Information Security blog.

In this write-up, I'll show you the steps I took to solve HackThis "Main Level" challenges. Hope this helps if you get stuck at any level, or want to see maybe another approach.

As a general introduction, HackThis provides challenges for Information Security enthusiasts, hackers, etc. In all "Main Level" challenges, we will only see an HTML form, which asks for Username and Password. Our mission on each level is to fill out this form with correct credentials, by hacking into the system and gathering valid credentials.


Let's walkthrough all the "Main Level" challenges together:

Main Level 1

In this challenge, (and in all the upcoming challenges,) I started by viewing the source code of the webpage. In Google Chrome, you can simply right-click on the page, and choose View page source, or press CTRL + U. If you are using another web browser, you can try something similar, or simply Google "how to view page source in X", where X stands for your web browser (e.g. "how to view page source in Mozilla Firefox").

In the page source, I searched for the keyword Username, by pressing CTRL + F and typing the keyword. Upon searching, the browser displays 3 matches. Among these 3 matches, one of them brings the most attention:

<!-- username: in, password: out -->

This is an HTML comment, which cannot be seen on the webpage; but can easily be seen by looking at the source code. In the comment, we see that the developer left the credentials in the source code, as an HTML comment. So, when we try logging in with the username in, and password out; we are done!

Lessons Learned: If you are a web developer, never leave sensitive information as a comment. If you are a hacker, read through the comments in the source code, which can hold precious information. In terms of this challenge, obviously no developer would leave a credential in the comments; but other non-trivial information, or clues to understand the source code better can be left as comments.

Main Level 2

Again, I started by viewing the source code of the webpage, and searching for the keyword Username. This time, we encounter something very unusual:


We see that there is a span next to the Username field, having a color #000000 (which stands for black, in terms of RGB), which has a text: resu. Similarly, a span next to the Password field, with text ssap. So, we have found the username and the password already!

Moreover, since these texts are within the source code (uncommented), we should be able to see them on the webpage. The reason why we don't see them is since both the background color and the text color are black! By left-clicking and holding the mouse from the beginning of the webpage to the down, we see a highlighted version of the webpage, which holds the username and the password, as expected:


So yes, we are done!

Lessons Learned: It is impossible to hide information by just visual arrangements. There is the source code which shows everything within the webpage, and there are workarounds to some of the visual tricks.

Main Level 3

Again, let's look at the source code. This time, when I searched for the keyword "Username", I only got 2 matches, which didn't help too much. So, I decided to do another search related to the HTML form. 

Each HTML form has to be submitted to the web server, so that the data entered reaches to the website. This is done with a submit action. Hence, I decided to search for the keyword submit. This search returned 6 matches, one of which was really interesting:

<script type='text/javascript'>
$(function(){
$('.level-form').submit(function(e){
if(document.getElementById('user').value == 'heaven' && document.getElementById('pass').value == 'hell') { }
else { e.preventDefault(); alert('Incorrect login') }
})
})
</script>

This code is a JavaScript function, which submits the .level-form. In particular, document.getElementById() function returns the HTML element with the corresponding ID. In this code, it is used twice; one for ID user and one for ID pass, which are actually the fields of our HTML form. We can see that the values heaven and hell are passed to the fields user and pass, respectively, in our HTML form; and an "Incorrect login" alert is issued if any other value is passed.

Hence, we try heaven as username, and hell as password. And, voilà! We are done!

Lessons Learned: JavaScript is an integral part of the websites today. Many JavaScript functions are being used in most of the websites; so one needs to pay attention to those functions, as they can hold precious information.

Main Level 4

Again, and again, I started by viewing the source code of the webpage. This time, searching for the keyword Username, and looking at the HTML form's source code gives an interesting result:

<form method="POST">
  <fieldset>
    <label for="user">Username:</label>
    <input type="Text" name="user" id="user" autocomplete="off"><br>
    <label for="user">Password:</label>
    <input type="Password" name="pass" id="pass" autocomplete="off"><br>
   
<input type="hidden" name="passwordfile" value="../../extras/ssap.xml">
    <input type="submit" value="Submit" class="button">
  </fieldset>
</form>

The highlighted code is present now, different from the older levels. It is a hidden HTML input field, which is hidden from the users. But as seen, we are able to look at the source code and see what is inside in the "hidden" field. We see that the hidden input field is named as passwordfile, which is an obvious hint to us, and its value is ../../extras/ssap.xml, which looks like a path to the passwordfile.

Now, I tried reaching to the file by entering this URL into the browser:

https://www.hackthis.co.uk/levels/main/4/../../extras/ssap.xml

As I expected, I encountered an XML file named ssap.xml:

<user>
<name>Admin</name>
<username>999</username>
<password>911</password>
</user>

This obviously shows that there is an Admin user, having username 999 and password 911. Upon entering this information, we are done!

Lessons Learned: Hidden HTML fields are not hidden! Moreover, files inside a website could be reached by traversing through directories. For securing the website, the access to each file should be controlled; only authorized users should be able to reach them.

Main Level 5

Now, a dialogue box welcomes us upon entering the website, asking for a Password. So, I again looked at the source code of the website; but this time searching for the keyword "Password", as it appeared in the dialogue box. The first occurrence seems quite interesting:

<script language="JavaScript" type="text/javascript">
  var pass;
  pass=prompt("Password","");
  if (pass=="9286jas") {
    window.location.href="/levels/main/5?pass=9286jas";
  }
</script>

As seen above, we again have a JavaScript code, as in Main Level 3. This script prompts for a Password, which is the password we are asked on the screen we encounter once we visit the website. We notice the if-statement inside the above script:

if (pass=="9286jas") {

This means that if the string 9286jas is entered when the prompt dialogue box appears, the website will be redirected to the href: /levels/main/5?pass=9286jas. If we enter that password, we are redirected to that hyper reference, and we are done with the level! Moreover, noticing that we are done upon being directed to that website, we can simply enter that URL to our browser, and we are done without even entering an input to the prompt dialogue box!

Lessons Learned: Again as Main Level 3, pay close attention to JavaScript code!

Main Level 6

This time, a different login screen welcomes us; informing that we need to login as Ronald to pass the level. However, there is a small issue here. There is no option as Ronald in the Username list below!


So, we need to somehow modify the username, outside the website. We should notice a fact here.

Since we use a browser to browse the web, which satisfies our daily purposes, the machine-to-machine interaction goes between the website and our browser. They understand each other using a protocol, called HyperText Transfer Protocol, HTTP, or a secure version of the HTTP, which is HyperText Transfer Protocol over Secure Socket Layer, HTTPS.

In these protocols, data transfers are accomplished from machine to another machine. Since we have access to our own machine, we notice ourselves that we can intervene with this machine communication. We should somehow be able to modify the data going between HTTP/HTTPS.

For special modifications, we should either use a program, browser plugin, or maybe even write our own program. However, for the purposes of this level, to modify the Username, I used Google Chrome itself. If your browser supports modifications, you also can simply use your own browser to pass the level.

Hovering the mouse on the username list field, I right clicked the webpage, chose Inspect among the options. This option gives us the chance to inspect the specific elements of the webpage easily, without the need to search through the source code. Moreover, it has an ability to modify the code, which we are going to see in seconds.

Inspecting the element, we get the following result:

<select id="user" name="user">
  <option>John</option>
  <option>Petter</option>
  <option>David</option>
  <option>Sam</option>
</select>

This is the list of the usernames. To be able to login as Ronald, I double clicked one of the options on the Inspect pane of Google Chrome, say David, changed the text "David" to "Ronald". Then, I chose Ronald from the options on the website, clicked to Submit button, and it's done!


Lessons Learned: Don't trust to the users! The client-side code can always be changed! To provide the integrity of the data, and to protect against tampering, websites should implement server-side checks. The data sent from the user should always be controlled. No assumption should be made on the data coming from the user at the server side.

The next part of this write-up, i.e., Main Level 7-10 Solutions can be found via this link.